
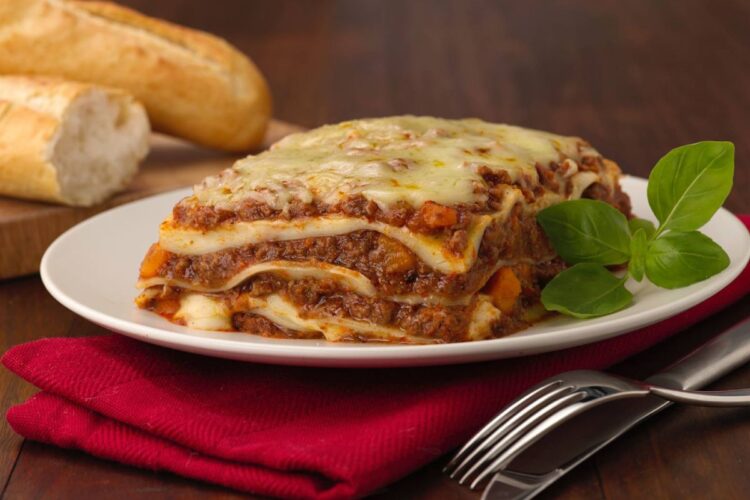
As someone deeply passionate about cooking, I’ve always found lasagna to be a fascinating dish. It’s not just about layering noodles, sauce, and cheese; it’s an art form, a delicate balance of flavors and textures that can turn an ordinary dinner into a memorable feast. Today, I want to share my journey of mastering the perfect lasagna.
The Key Elements
Before diving into the cooking time, let’s talk about the components that make lasagna so special:
- The Sauce: Whether you’re a fan of rich meat sauce or prefer a vegetarian version, the sauce is the soul of your lasagna. It needs to be flavorful and cooked just right.
- The Cheese: A mix of mozzarella, ricotta, and Parmesan creates a creamy, gooey, and slightly tangy flavor profile that’s irresistible.
- The Noodles: Choosing the right type of lasagna noodles and preparing them correctly is crucial. I prefer traditional noodles that require boiling, but no-boil noodles are a great time-saver.
The Cooking Time: The Crucial Factor
Now, the big question: How long should you cook your lasagna? After much experimentation, I’ve found that the ideal baking time is about 45 minutes at 375°F (190°C). But there’s more to it:
- Preheat Your Oven: Always start with a preheated oven for even cooking.
- Cover with Foil: For the first 30 minutes, cover your lasagna with aluminum foil to prevent the top from burning.
- Uncover and Bake: Remove the foil and bake for an additional 15 minutes to get a beautifully browned and bubbly top.
- Resting Time: After baking, let your lasagna rest for about 15 minutes. This allows the layers to set and makes it easier to cut.
Personal Touches and Tips
- Sauce Consistency: Ensure your sauce isn’t too runny; a thicker sauce yields better layering.
- Seasoning: Don’t shy away from herbs like basil or oregano to add depth to your sauce.
- Cheese Quality: Use good quality cheese for a richer flavor.
- Experiment with Layers: Feel free to add vegetables like spinach or mushrooms for a twist.
Conclusion: A Dish Worth the Effort
Making lasagna may seem daunting at first, but it’s a rewarding experience. The key to perfect lasagna lies in the balance of its components and, most importantly, the cooking time. By following these tips and adding your personal touch, you can create a lasagna that’s not just a dish, but a story on a plate.
Happy Cooking!
Embracing Convenience: My Journey with Pre-Made Lasagna
Welcome to my kitchen diary! Today, I’m exploring a different culinary adventure – cooking with pre-made, frozen, and store-bought lasagna. It’s about finding the balance between convenience and the comforting taste of this classic dish.
Why Pre-Made Lasagna?
In the whirlwind of daily life, I often turn to convenient meal solutions. Lasagna, with its comforting layers and rich flavors, is a favorite in my household. But making it from scratch is time-consuming, so pre-made lasagna has become my go-to choice for a quick, satisfying meal.
Cooking Frozen Lasagna: A Step-by-Step Guide
Frozen lasagna is a staple in my freezer. It requires more oven time but promises a homely taste. Here’s how I do it:
- Preheating: A must. I set my oven to 375°F (190°C).
- Baking Covered: I keep the foil on and bake for about 45 minutes.
- Uncovering for the Finish: I remove the foil for the last 15 minutes for a golden crust.
- Temperature Check: Ensuring it reaches 165°F (74°C) in the center.
The Middle Ground: Store-Bought, Refrigerated Lasagna
This type of lasagna is a nice balance. It’s fresher than frozen but still convenient. My approach:
- Oven Ready: Preheated to 375°F (190°C).
- Foil Cover Baking: I bake it covered for 25-30 minutes.
- Crispy Top Layer: Uncovered for the last 10 minutes.
Personalizing Pre-Made Lasagna
I love adding my own twist to these lasagnas:
- Cheese, Please: Extra mozzarella or Parmesan for the last bit of baking.
- Herbal Touch: Sprinkling dried basil, oregano, or red pepper flakes.
- Accompaniments: Serving with garlic bread or a fresh salad.
Concluding Thoughts: A Delightful Compromise
While homemade lasagna holds its special charm, pre-made lasagna has carved out its own place in my kitchen. It’s about embracing the convenience without compromising on the joy of a hearty meal.
Stay tuned for more culinary explorations and remember, every meal is a new adventure!
Navigating Leftovers: My Safe Storage and Reheating Tips for Lasagna
As someone who loves cooking in big batches, I often find myself facing the delightful challenge of handling leftover lasagna. There’s an art to storing and reheating this layered delicacy to ensure it remains as delicious as it was fresh out of the oven. Today, I want to share my personal strategies for safely handling leftover lasagna.
Understanding Food Safety for Leftovers
The first step in managing leftovers is understanding food safety. I always keep in mind that cooked lasagna should not sit out at room temperature for more than two hours. Bacteria grow rapidly at temperatures between 40°F and 140°F, so prompt refrigeration is key.
Storing Leftover Lasagna
Here’s how I store my leftover lasagna to maintain its quality and safety:
- Cooling Down: I let the lasagna cool to room temperature for no longer than two hours.
- Portioning: I slice the leftovers into individual portions. This makes reheating easier and helps the lasagna cool more quickly.
- Air-Tight Containers: I use air-tight containers to store the lasagna portions. This keeps them fresh and prevents them from absorbing odors from the refrigerator.
- Refrigeration: I refrigerate the portions promptly. Properly stored, leftover lasagna will last for 3 to 5 days in the fridge.
Freezing for Longer Storage
For long-term storage, freezing is my go-to method:
- Wrap It Up: I wrap individual portions tightly in plastic wrap and then in aluminum foil.
- Label and Freeze: I label each portion with the date and place them in the freezer. Frozen lasagna can last for 2 to 3 months.
Reheating Leftover Lasagna
Reheating is crucial for enjoying leftover lasagna. Here’s how I do it:
- Oven Reheating: I preheat my oven to 350°F (175°C). I place the lasagna in an oven-safe dish, cover it with foil to prevent it from drying out, and heat it for about 20 minutes or until it’s heated through.
- Microwave for Convenience: When I’m in a hurry, I use the microwave. I cover the lasagna with a microwave-safe lid or plastic wrap and heat it on medium power, checking every minute to avoid overheating.
Extra Tips for Perfect Leftovers
- Adding Moisture: If the lasagna seems a bit dry, I add a sprinkle of water or some extra sauce before reheating.
- Avoid Repeated Reheating: I reheat only the amount I plan to eat. Repeated reheating can degrade the quality and raise food safety concerns.
Conclusion: Making the Most of Leftovers
Leftover lasagna can be just as enjoyable as when it’s freshly baked, with the right storage and reheating techniques. By following these tips, I make sure that my lasagna remains a delicious and safe meal for days after the initial feast.
Remember, good food deserves good care!
Layering Love: My Secrets to Assembling the Perfect Lasagna
Welcome back to my kitchen, where today’s culinary adventure is all about the art of lasagna assembly. Lasagna, to me, is more than just a dish; it’s a canvas where layers upon layers create a harmonious symphony of flavors and textures. Let me share with you my personal tips and tricks for layering and assembling the ultimate lasagna.
1. Choosing the Right Ingredients
Before we dive into the layering process, let’s talk ingredients. For me, lasagna is a trio of perfection: the sauce, the cheese, and the noodles. I prefer a rich, hearty meat sauce, but a robust vegetable sauce works wonders too. For cheese, a blend of mozzarella, ricotta, and Parmesan creates that creamy, melt-in-your-mouth magic. And let’s not forget the lasagna noodles – whether you prefer traditional, no-boil, or homemade, each brings its unique texture to the dish.
2. Preparing Your Components
Preparation is key. I always cook my sauce ahead of time, letting it simmer to develop depth of flavor. The cheese mixture, usually ricotta mixed with an egg and herbs, needs to be creamy and spreadable. As for the noodles, if I’m not using no-boil noodles, I cook them al dente, so they don’t turn mushy during baking.
3. The Assembly Line: My Layering Technique
Now, the fun part – assembling the lasagna. Here’s my step-by-step process:
- First Layer – Sauce: I start with a thin layer of sauce at the bottom of my baking dish. This prevents the noodles from sticking and kick-starts the flavor journey.
- Second Layer – Noodles: Next, a layer of noodles. I lay them side by side, slightly overlapping, to create a stable base.
- Third Layer – Cheese: I dollop generous spoonfuls of the ricotta mixture over the noodles, then gently spread it. Sprinkling a layer of grated mozzarella and Parmesan comes next.
- Repeat: I repeat the layering – sauce, noodles, cheese – until the dish is nearly full, usually three to four layers.
- Top Layer – Finishing Touches: The final layer is crucial. I finish with a layer of noodles, topped with sauce and a generous sprinkle of cheeses. This ensures a gorgeously melted and browned top.
4. Baking to Perfection
I bake my lasagna covered with foil at 375°F (190°C) for about 25 minutes, then uncover and bake for another 25 minutes to achieve that beautiful golden top. Letting it rest for 15 minutes before serving is my secret to perfectly set layers.
5. Personalizing Your Lasagna
Experimenting is part of the fun. Sometimes I add layers of sautéed vegetables, or switch up the cheeses for a different flavor profile. The beauty of lasagna lies in its versatility and the personal touch you bring to it.
Conclusion: A Labor of Love Worth Every Layer
Assembling lasagna might be a labor of love, but the result is always worth the effort. Each layer, each ingredient, comes together to create a dish that’s hearty, comforting, and a crowd-pleaser. Remember, the best lasagna is the one made with passion and patience.
Happy layering, and even happier eating!